关闭欢迎消息
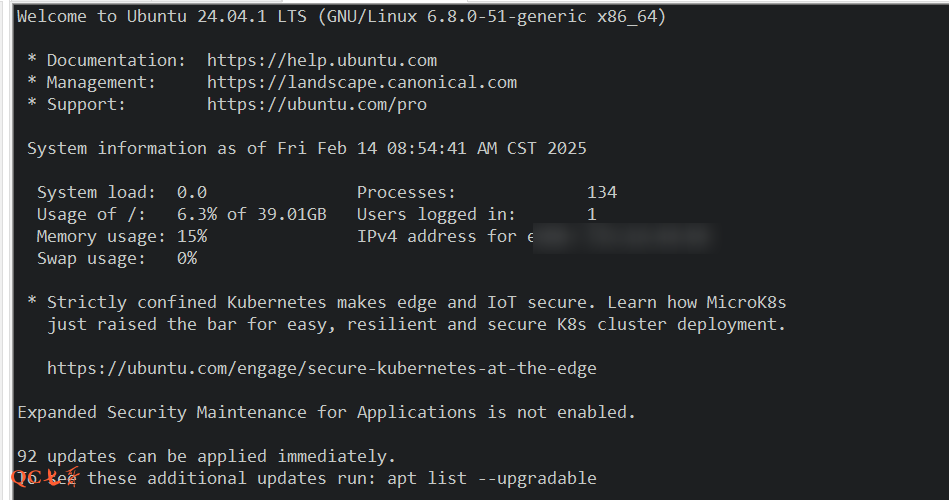
服务器安装好 ubuntu 系统后,进行终端登录,会显示出很多的欢迎消息
通过在用户的根目录下执行 touch .hushlogin 命令,再次登录终端就不会出现欢迎消息
修改hostname显示
修改 /etc/hostname 文件内容为主机名,保存后重启系统
修改/etc/hosts配置
ubuntu 默认会启动 cloud-init 服务,机器启动的时候会执行 /usr/bin/cloud-init init
这个服务有一个操作,就是会修改 /etc/hosts 的记录,将本地配置的 hosts 记录全部覆盖掉
覆盖后 /etc/hosts 文件的起始有一段如下
# Your system has configured 'manage_etc_hosts' as True.
# As a result, if you wish for changes to this file to persist
# then you will need to either
# a.) make changes to the master file in /etc/cloud/templates/hosts.debian.tmpl
# b.) change or remove the value of 'manage_etc_hosts' in
#     /etc/cloud/cloud.cfg or cloud-config from user-data
#

127.0.1.1 C20240916082764.local C20240916082764
127.0.0.1 localhost
新建文件禁止 cloud_init 执行 touch /etc/cloud/cloud-init.disabled,重启生效
关闭超时断开
修改 /etc/ssh/sshd_config 的配置,在文件最后增加两行,值视情况修改
修改后运行 systemctl restart sshd 重启生效
ClientAliveInterval 60  # 每隔 60 秒向客户端发送一个心跳包
ClientAliveCountMax 3   # 如果连续 3 次没有收到客户端响应,则断开连接
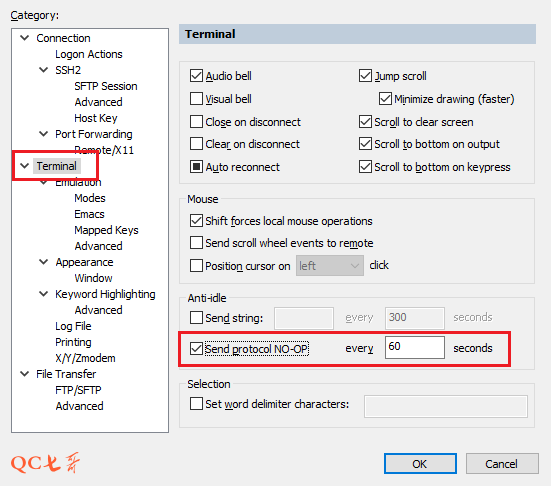
修改 SecureCRT 的设置,点击 “Options” -> “Terminal”,勾选 Send Protocol NO-OP,设置一个时间值
防火墙配置
初始化情况下,防火墙并没有启动,使用 ufw enable 进行启用防火墙
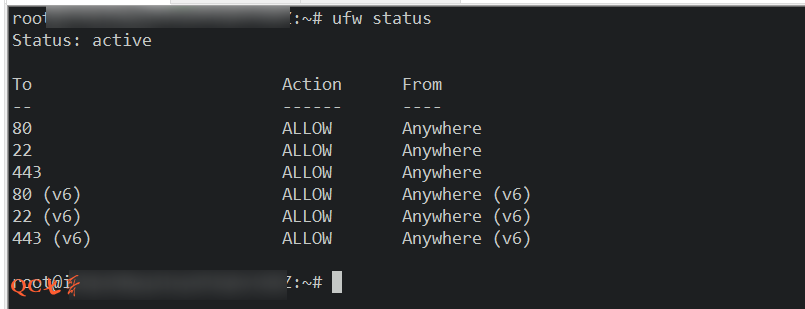
防火墙启动后运行 ufw status,就会看到防火墙的状态为活跃状态 Status: active
通过 ufw allow 80 指令添加允许的端口,下面的端口应该加到允许列表中,其他端口视情况添加
22  #ssh访问的端口
80  #http的默认端口
443 #https的默认端口
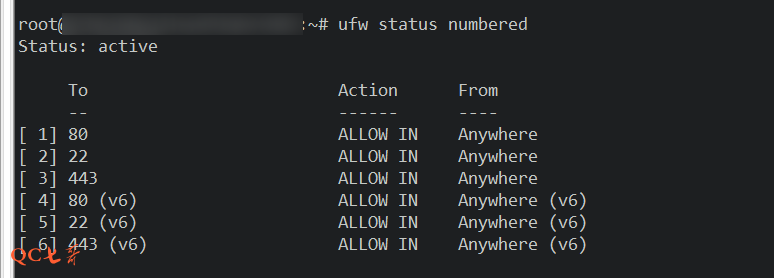
通过 ufw status 查看防火墙的状态,可以看到当前已经开启的端口
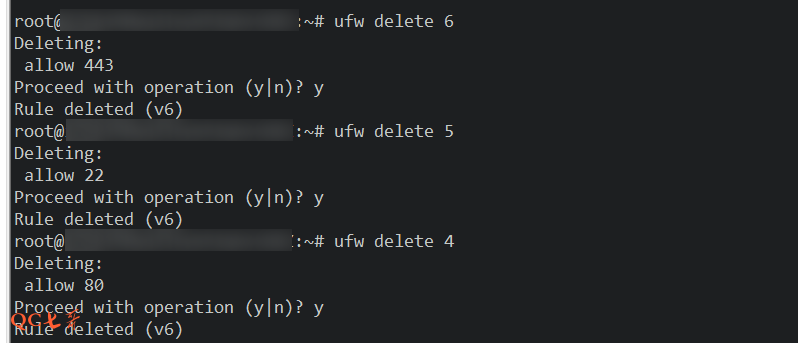
通过 ufw status numbered 可以查看规则的 numbered ,删除的时候需要通过 numbered 进行删除
删除规则的时候建议倒序删,因为删中间的记录,会导致后面的记录序号前移
安装web服务
想要简单的可以通过宝塔安装,但是宝塔的配置看起来十分混乱,所以还是自己安装更清晰一点
安装 nignx 或者 apache 服务,可选其中之一,安装后服务会自启动
apt update
apt install nginx
apt install apache2
如果需要停止取消自启动,可以通过下面命令关闭
systemctl stop apache2
systemctl disable apache2
安装 php 服务的指定版本,php 对应的组件建议也安装下,特别是 php7.4-fpm 这个
add-apt-repository ppa:ondrej/php
apt update
apt install php7.4 php7.4-cli php7.4-gd php7.4-fpm php7.4-mysql php7.4-json php7.4-common php7.4-xml php7.4-zip php7.4-curl php7.4-mbstring php7.4-bcmath
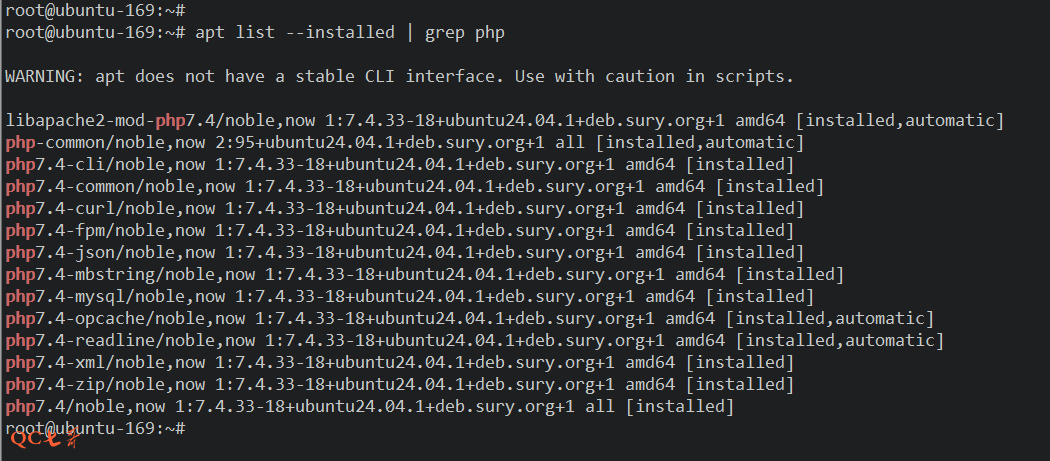
安装后可以通过 apt list --installed | grep php命令查看当前安装了哪些 php 的应用模块
安装 mysql,默认会安装 8.0 版本的,client 也一起安装上,安装后 mysql 服务也会自启动
apt install mysql-server mysql-client
配置nginx
nginx 的配置文件在 /etc/nginx/nginx.conf,修改配置然后 nginx -s reload 进行重新加载
配置重载生效后,通过浏览器访问页面显示出 Hello World! 表示配置成功
user root;
worker_processes auto;
pid /run/nginx.pid;
#include /etc/nginx/modules-enabled/*.conf;

events {
        worker_connections 768;
        # multi_accept on;
}

http {
        sendfile on;
        tcp_nopush on;
        server_tokens off;
        types_hash_max_size 2048;
        # server_tokens off;

        # server_names_hash_bucket_size 64;
        # server_name_in_redirect off;

        set_real_ip_from 0.0.0.0/0;
        real_ip_header CF-Connecting-IP;
        real_ip_recursive on;

        include /etc/nginx/mime.types;
        default_type application/octet-stream;

        ssl_ciphers HIGH:!aNULL:!MD5;
        ssl_protocols TLSv1 TLSv1.1 TLSv1.2 TLSv1.3; # Dropping SSLv3, ref: POODLE
        ssl_prefer_server_ciphers on;

        log_format main 'client[$remote_addr] cf[$realip_remote_addr] - $scheme[$time_local] request[$request] '
            '$status send[$body_bytes_sent] host[$host] refer[$http_referer] useragent[$http_user_agent]';

        map $http_user_agent $loggable {
            default 1;  # default log to access.log
            "~*test" 0;  # remove log if User-Agent contain "test"
        }

        access_log /root/nginx/logs/access.log main if=$loggable;
        error_log  /root/nginx/logs/error.log;

        gzip on;
        # gzip_vary on;
        # gzip_proxied any;
        # gzip_comp_level 6;
        # gzip_buffers 16 8k;
        # gzip_http_version 1.1;
        # gzip_types text/plain text/css application/json application/javascript text/xml application/xml application/xml+rss text/javascript;

        server {
            listen 80 default_server;
            server_name _;
            location / {
                default_type text/plain;
                add_header Content-Type text/plain;
                return 200 'Hello World!';
            }
        }
}
配置ssl
生成自签发证书包含两部分,私钥和证书,先生成私钥,然后再在私钥的基础上生成证书
生成私钥
openssl genrsa -out private.key 2048
生成证书签名请求
openssl req -new -key private.key -out request.csr
生成自签名证书
-days 参数指定证书的有效期
openssl x509 -signkey private.key -in request.csr -req -out certificate.crt -days 365
nginx支持ssl
将证书和私钥保存到某路径下,然后 nginx.conf 增加 server 配置如下
server {
    listen 443 ssl;
    server_name _;

    ssl_certificate /path/to/cert/certificate.crt;
    ssl_certificate_key /path/to/cert/private.key;

    location / {
        index index.html
        root /path/to/root/;
    }
}
运行 nginx -s reload 重新加载 nginx 配置,执行请求 wget https://127.0.0.1/ --no-check-certificate 进行测试
配置mysql
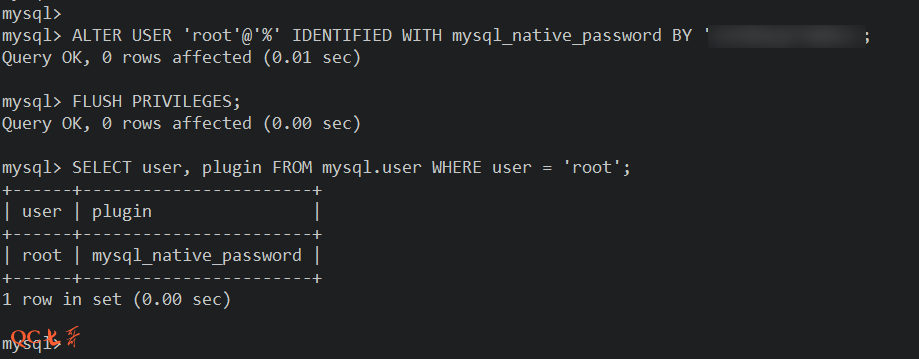
默认的身份验证插件为 auth_socket ,允许本机系统用户直接登录,无需密码
可以通过下面语句获取用户的身份验证插件
SELECT user, plugin FROM mysql.user WHERE user = 'root';

但是部署系统的时候需要使用账户密码进行连接,因此这个验证插件需要为 mysql_native_password
使用下面命令进行设置验证插件以及修改密码,并通过 FLUSH 生效,这里的密码需要一个复杂的密码
ALTER USER 'root'@'localhost' IDENTIFIED WITH mysql_native_password BY 'xxxxxx';
FLUSH PRIVILEGES
如果需要修改为简单的密码,还需要额外的调整策略
SET GLOBAL validate_password.policy = LOW; -- 降低策略要求
SET GLOBAL validate_password.length = 4;   -- 允许更短密码
我这里已经设置了允许外部主机连接数据库 %,具体设置可以参考 我的另一篇文章
创建用户
使用 root 登录 mysql 后 mysql -h localhost -u root -p,使用以下命令
进行新建用户以及设置密码,并对用户进行授权,操作完毕后 flush 生效
CREATE USER 'abc'@'%' IDENTIFIED BY 'abc';

GRANT CREATE, SELECT, INSERT, UPDATE, DELETE ON db.* TO 'abc'@'%';

FLUSH PRIVILEGES;
配置php
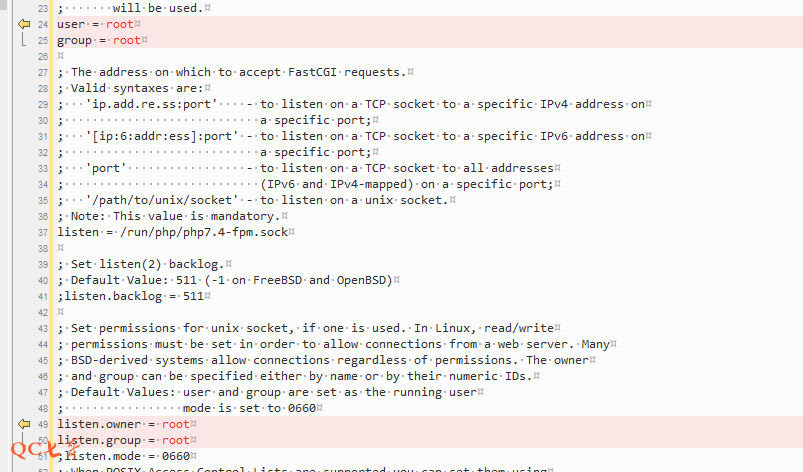
修改 /etc/php/7.4/fpm/pool.d/www.conf 配置文件,将下面的 user、group 改为 root 用户
修改之后,还有一个地方需要修改,通过 help 可以看到,php-fpm 默认是不支持 root 启动的,需要以 R 参数启动
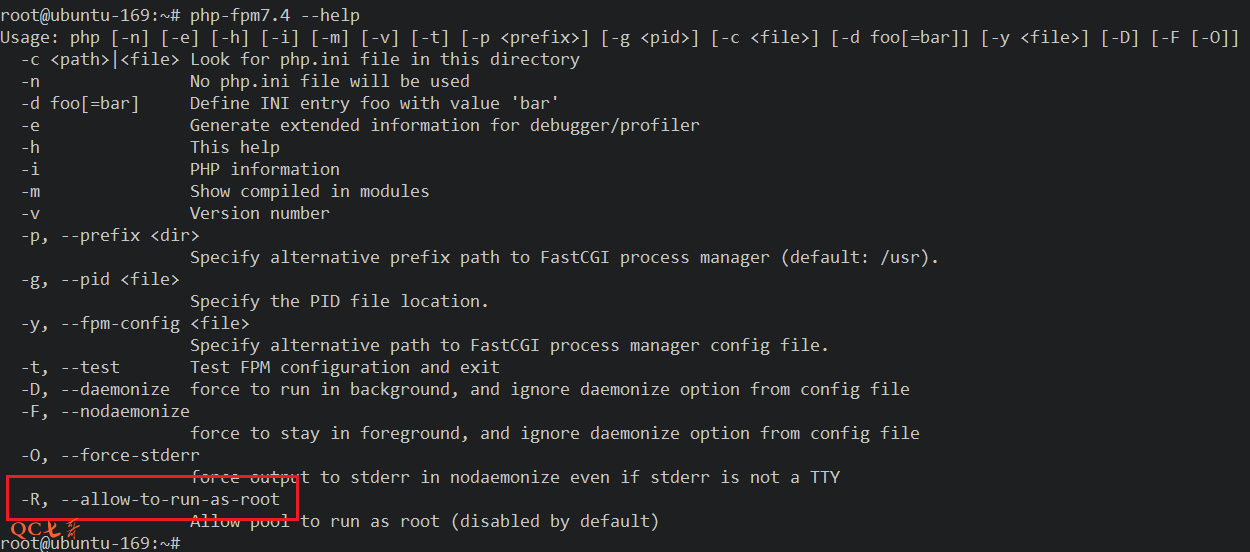
在 /usr/lib/systemd/system/php7.4-fpm.service 文件的启动命令加一个 R 参数,允许以 root 启动

修改完毕后,运行 systemctl daemon-reload 使得 service 配置修改生效
然后再运行 systemctl restart php7.4-fpm 进行 php 模块的重启
测试php是否生效
配置好 php 之后,在 nginx 中新增一个location,内容如下
location ~ \.php$ {
    root           /root/nginx/html/;
    fastcgi_pass   unix:/run/php/php7.4-fpm.sock;
    fastcgi_index  index.php;
    fastcgi_param  SCRIPT_FILENAME $document_root$fastcgi_script_name;
    include        fastcgi_params;
}
在 /root/nginx/html/ 目录下新增一个 phpinfo.php 的文件
<?php
phpinfo();
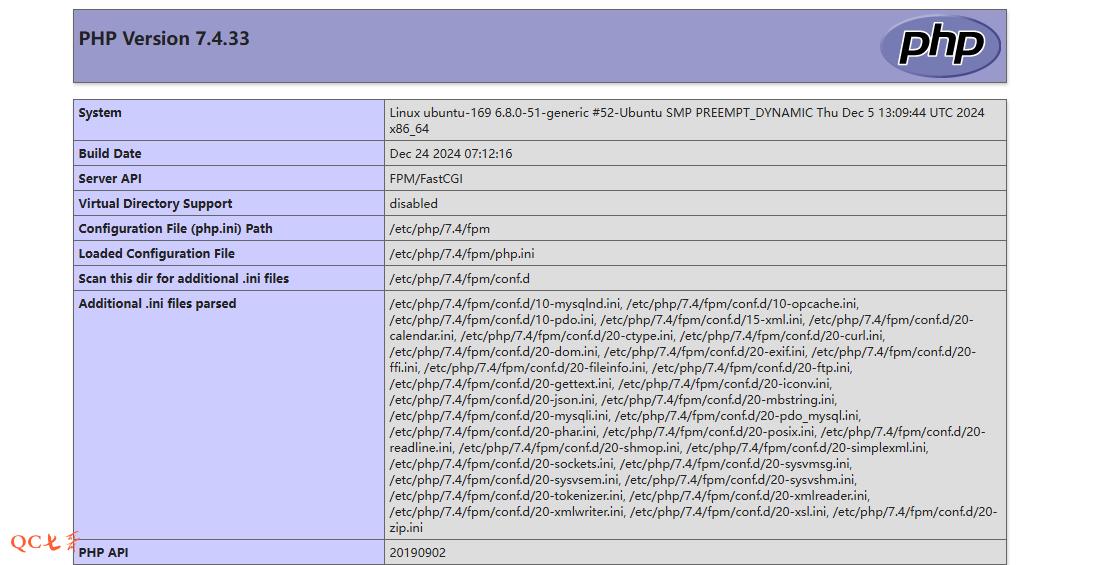
重新加载 nginx 配置,然后浏览器访问 http://IP地址/phpinfo.php 就可以看到以下的页面信息了
