


理论
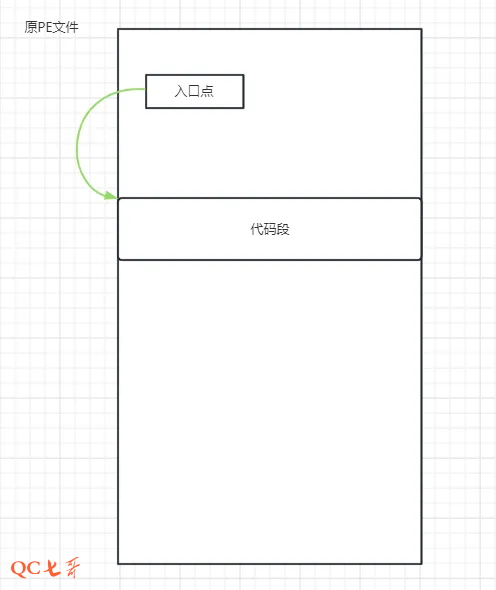
一个可运行的执行文件,至少会有一个代码段,程序的入口点指向代码段,程序运行的时候,从入口点开始执行代码段指令
为了将一个正常的程序进行加壳保护,至少要三部分逻辑配合
1、待加壳保护的程序
2、加壳逻辑
3、脱壳逻辑
为便于理解,以下仅描述主要的逻辑,以 windows 为例,运行加壳程序,将待加壳程序的二进制内容读入到内存块
将该内存块解析成 PE 结构,并对该 PE 结构的代码段执行加密操作,如异或一个 KEY 或使用定制的加密算法
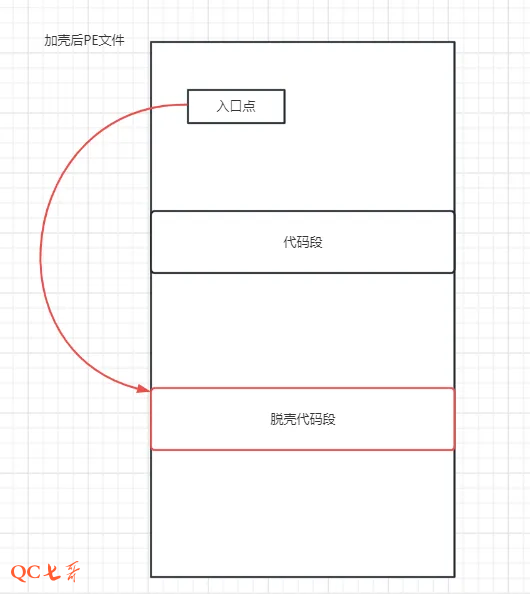
将该 PE 结构进行新增代码段,新增节的内容填充为脱壳的代码逻辑,用于在程序运行的时候对原逻辑进行解密脱壳
修改内存块内容,将入口点 base 地址指向脱壳代码段,还需要修正其他的额外信息,如 PE 文件大小等其他一些属性
将该内存区块保存成执行文件,在发布的时候将该执行文件提供给客户
发布的程序在启动的时候,会先运行脱壳代码段指令,将原代码段解密释放出来,并通过内存映射到一个新的代码段中
解压完后跳转到代码段中运行,实际应用中的加壳脱壳更麻烦,还会涉及到段合并以及重定位等一系列复杂的操作
HelloWorld
为了便于理解,演示代码不使用增加节的复杂操作,这里将待加壳程序打包为一个数组
待加壳程序
编写一个程序代码如下,将代码文件保存为 hello.c,编译命令 gcc heelo.c -o hello
#include <stdio.h>

int value = 102;

int main() {
    printf("Hello, World: %d\n", value);
    return 0;
}
加壳脱壳代码
编写 packer 和 shell 程序,这里实现分为两步
一个是将待加壳程序进行打包为数组,再一个将数组和脱壳逻辑打包到一起,作为发布的程序
将下面代码保存为 packer.c,编译命令为 gcc packer.c -o packer,生成 packer 执行文件
#include <stdio.h>
#include <stdlib.h>
#include <string.h>
#include <fcntl.h>
#include <unistd.h>
#include <sys/stat.h>

void encrypt(unsigned char *data, unsigned int size, unsigned char key) {
    for (unsigned int i = 0; i < size; i++) {
        data[i] ^= key;
    }
}

int main(int argc, char *argv[]) {
    if (argc != 3) {
        printf("用法: %s <原始程序> <输出文件>\n", argv[0]);
        return 1;
    }

    int src_fd = open(argv[1], O_RDONLY);
    if (src_fd == -1) {
        perror("打开源文件失败");
        return 1;
    }

    struct stat st;
    fstat(src_fd, &st);
    unsigned int size = st.st_size;

    unsigned char *buffer = (unsigned char *)malloc(size);
    if (!buffer) {
        perror("内存分配失败");
        close(src_fd);
        return 1;
    }

    if (read(src_fd, buffer, size) != size) {
        perror("读取文件失败");
        free(buffer);
        close(src_fd);
        return 1;
    }
    close(src_fd);

    encrypt(buffer, size, 0x42); // 使用0x42作为密钥

    FILE *out = fopen("encrypted_binary.h", "w");
    if (!out) {
        perror("创建输出文件失败");
        free(buffer);
        return 1;
    }

    fprintf(out, "unsigned char encrypted_data[] = {\n");
    for (unsigned int i = 0; i < size; i++) {
        fprintf(out, "0x%02x", buffer[i]);
        if (i < size - 1) fprintf(out, ", ");
        if ((i + 1) % 12 == 0) fprintf(out, "\n");
    }
    fprintf(out, "\n};\n");
    fclose(out);

    printf("已生成加密数据文件 encrypted_binary.h\n");
    printf("现在编译壳程序:\n");
    printf("gcc -o %s shell.c\n", argv[2]);

    free(buffer);
    return 0;
}
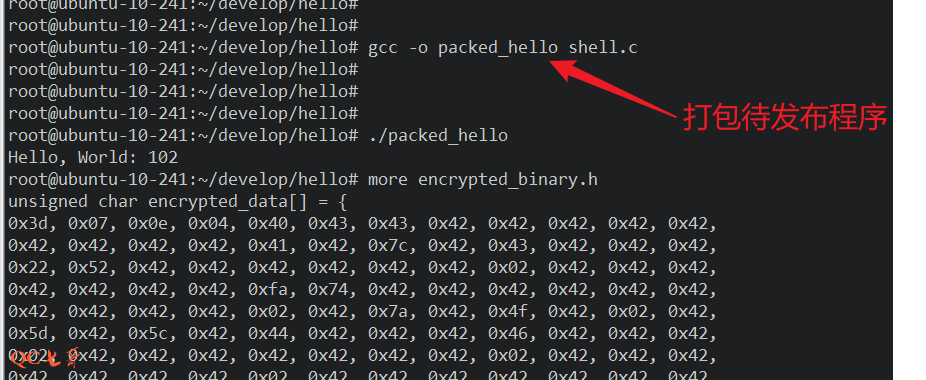
运行上述的 packer 程序 ./packer hello packed_hello,生成一个 encrypted_binary.h 数组文件

这个文件就是 hello 程序的内容,只不过转为了数组,将该数组文件 include 到 shell.c 代码中,shell.c 代码如下
#include <stdio.h>
#include <stdlib.h>
#include <string.h>
#include <unistd.h>
#include <sys/mman.h>
#include <fcntl.h>
#include <sys/stat.h>

/*
// 这将是我们的加密后的程序数据
// 实际应用中,这部分会通过某种算法加密,这里为了简单仅做了XOR运算
unsigned char encrypted_data[] = {
    // 这里会存放加密后的程序内容
    // 实际应用中这是通过工具自动生成的
};
*/
#include "encrypted_binary.h"

unsigned int encrypted_size = sizeof(encrypted_data);

// 简单的解密函数 (这里使用XOR作为示例)
void decrypt(unsigned char *data, unsigned int size, unsigned char key) {
    for (unsigned int i = 0; i < size; i++) {
        data[i] ^= key;
    }
}

int main() {
    // 创建临时文件来存储解密后的程序
    char temp_path[] = "/tmp/temp_executable_XXXXXX";
    int fd = mkstemp(temp_path);
    if (fd == -1) {
        perror("创建临时文件失败");
        return 1;
    }

    // 解密程序数据
    unsigned char *decrypted_data = malloc(encrypted_size);
    if (!decrypted_data) {
        perror("内存分配失败");
        close(fd);
        unlink(temp_path);
        return 1;
    }

    memcpy(decrypted_data, encrypted_data, encrypted_size);
    decrypt(decrypted_data, encrypted_size, 0x42); // 使用0x42作为密钥

    // 将解密后的数据写入临时文件
    if (write(fd, decrypted_data, encrypted_size) != encrypted_size) {
        perror("写入临时文件失败");
        free(decrypted_data);
        close(fd);
        unlink(temp_path);
        return 1;
    }

    // 设置执行权限
    fchmod(fd, S_IRWXU);
    close(fd);
    free(decrypted_data);

    // 执行解密后的程序
    if (execl(temp_path, temp_path, NULL) == -1) {
        perror("执行程序失败");
        unlink(temp_path);
        return 1;
    }

    // 注意:如果execl成功,以下代码不会执行
    // 临时文件清理需要在子进程或信号处理中完成
    return 0;
}
编译命令为 gcc -o packed_hello shell.c ,生成 packed_hello 执行文件,该文件就是最终发布的程序
这里代码将执行文件保存为临时文件并使用 execl 的方式执行,实际上不会这么处理的
更正常的处理方式是通过 mmap 内存映射到方式进行,不过核心思想都是一样的,主要为了方便理解
运行加壳后的程序的输出结果,和原始程序的输出结果一致
评论区